
Quick Start
This guide covers getting started with the
kindcommand.If you are having problems please see the known issues guide.
Contents 🔗︎
Installation 🔗︎
NOTE:
kinddoes not requirekubectl, but you will not be able to perform some of the examples in our docs without it. To installkubectlsee the upstream kubectl installation docs.
If you are a go developer you may find the go install option convenient.
Otherwise we supply downloadable release binaries, community-managed packages, and a source installation guide.
Stable tagged releases (currently v0.29.0) are generally strongly recommended for CI usage in particular.
You may need to install the latest code from source at HEAD if you are developing Kubernetes itself at HEAD / the latest sources.
Installing From Release Binaries 🔗︎
Pre-built binaries are available on our releases page.
To install, download the binary for your platform from “Assets”, then rename it to kind (or perhaps kind.exe on Windows) and place this
into your $PATH at your preferred binary installation directory.
On Linux:
|
On macOS:
|
On Windows in PowerShell:
|
Installing From Source 🔗︎
In addition to the pre-built binary + package manager installation options listed
above you can install kind from source with go install sigs.k8s.io/kind@v0.29.0 or clone this repo
and run make build from the repository.
Installing With make 🔗︎
Using make build does not require installing Go and will build kind reproducibly,
the binary will be in bin/kind inside your clone of the repo.
You should only need make and standard userspace utilities to run this build,
it will automatically obtain the correct go version with our vendored copy of gimme.
You can then call ./bin/kind to use it, or copy bin/kind into some directory in your system PATH to
use it as kind from the command line.
make install will attempt to mimic go install and has the same path requirements as go install below.
Installing with go install 🔗︎
When installing with Go please use the latest stable Go release. At least go1.16 or greater is required.
To install use: go install sigs.k8s.io/kind@v0.29.0.
If you are building from a local source clone, use go install . from the top-level directory of the clone.
go install will typically put the kind binary inside the bin directory under go env GOPATH, see
Go’s “Compile and install packages and dependencies”
for more on this.
You may need to add that directory to your $PATH if you encounter the error
kind: command not found after installation, you can find a guide for adding a directory to your PATH at https://gist.github.com/nex3/c395b2f8fd4b02068be37c961301caa7#file-path-md.
Installing With A Package Manager 🔗︎
The kind community has enabled installation via the following package managers.
NOTE: The following are community supported efforts. The
kindmaintainers are not involved in the creation of these packages, and the upstream community makes no claims on the validity, safety, or content of them.
On macOS via Homebrew:
|
On macOS via MacPorts:
|
On Windows via Chocolatey (https://chocolatey.org/packages/kind)
|
On Windows via Scoop (https://scoop.sh/#/apps?q=kind&id=faec311bb7c6b4a174169c8c02358c74a78a10c2)
|
On Windows via Winget (https://github.com/microsoft/winget-pkgs/tree/master/manifests/k/Kubernetes/kind)
|
Creating a Cluster 🔗︎
Creating a Kubernetes cluster is as simple as kind create cluster.
This will bootstrap a Kubernetes cluster using a pre-built
node image. Prebuilt images are hosted atkindest/node, but to find images suitable for a given release currently you should check the release notes for your given kind version (check with kind version) where
you’ll find a complete listing of images created for a kind release.
To specify another image use the --image flag – kind create cluster --image=....
Using a different image allows you to change the Kubernetes version of the created cluster.
If you desire to build the node image yourself with a custom version see the building images section.
By default, the cluster will be given the name kind.
Use the --name flag to assign the cluster a different context name.
If you want the create cluster command to block until the control plane
reaches a ready status, you can use the --wait flag and specify a timeout.
To use --wait you must specify the units of the time to wait. For example, to
wait for 30 seconds, do --wait 30s, for 5 minutes do --wait 5m, etc.
More usage can be discovered with kind create cluster --help.
The kind can auto-detect the docker, podman, or nerdctl installed and choose the available one. If you want to turn off the auto-detect, use the environment variable KIND_EXPERIMENTAL_PROVIDER=docker, KIND_EXPERIMENTAL_PROVIDER=podman or KIND_EXPERIMENTAL_PROVIDER=nerdctl to
select the runtime.
Interacting With Your Cluster 🔗︎
After creating a cluster, you can use kubectl to interact with it by using the configuration file generated by kind.
By default, the cluster access configuration is stored in ${HOME}/.kube/config if $KUBECONFIG environment variable is not set.
If $KUBECONFIG environment variable is set, then it is used as a list of paths (normal path delimiting rules for your system). These paths are merged. When a value is modified, it is modified in the file that defines the stanza. When a value is created, it is created in the first file that exists. If no files in the chain exist, then it creates the last file in the list.
You can use the --kubeconfig flag when creating the cluster, then only that file is loaded.
The flag may only be set once and no merging takes place.
To see all the clusters you have created, you can use the get clusters
command.
For example, let’s say you create two clusters:
kind create cluster # Default cluster context name is `kind`.
...
kind create cluster --name kind-2
When you list your kind clusters, you will see something like the following:
kind get clusters
kind
kind-2
In order to interact with a specific cluster, you only need to specify the cluster name as a context in kubectl:
kubectl cluster-info --context kind-kind
kubectl cluster-info --context kind-kind-2
Deleting a Cluster 🔗︎
If you created a cluster with kind create cluster then deleting is equally
simple:
kind delete cluster
If the flag --name is not specified, kind will use the default cluster
context name kind and delete that cluster.
Note: By design, requesting to delete a cluster that does not exist will not return an error. This is intentional and is a means to have an idempotent way of cleaning up resources.
Loading an Image Into Your Cluster 🔗︎
Docker images can be loaded into your cluster nodes with:
kind load docker-image my-custom-image-0 my-custom-image-1
Note: If using a named cluster you will need to specify the name of the cluster you wish to load the images into:
kind load docker-image my-custom-image-0 my-custom-image-1 --name kind-2
Additionally, image archives can be loaded with:
kind load image-archive /my-image-archive.tar
This allows a workflow like:
docker build -t my-custom-image:unique-tag ./my-image-dir
kind load docker-image my-custom-image:unique-tag
kubectl apply -f my-manifest-using-my-image.yaml
NOTE: You can get a list of images present on a cluster node by using
docker exec:docker exec -it my-node-name crictl imagesWhere
my-node-nameis the name of the Docker container (e.g.kind-control-plane).
NOTE: The Kubernetes default pull policy is
IfNotPresentunless the image tag is:latestor omitted (and implicitly:latest) in which case the default policy isAlways.IfNotPresentcauses the Kubelet to skip pulling an image if it already exists. If you want those images loaded into node to work as expected, please:
- don’t use a
:latesttagand / or:
- specify
imagePullPolicy: IfNotPresentorimagePullPolicy: Neveron your container(s).See Kubernetes imagePullPolicy for more information.
See also: Using kind with Private Registries.
Building Images 🔗︎
NOTE: If you’re using Docker Desktop, be sure to read Settings for Docker Desktop first.
kind runs a local Kubernetes cluster by using Docker containers as “nodes”.
kind uses the node-image to run Kubernetes artifacts, such
as kubeadm or kubelet.
The node-image in turn is built off the base-image, which
installs all the dependencies needed for Docker and Kubernetes to run in a
container.
Currently, kind supports one default way to build a node-image
if you have the Kubernetes source in your host machine
($GOPATH/src/k8s.io/kubernetes), by using source.
You can also specify a different path to kubernetes source using
kind build node-image /path/to/kubernetes/source
NOTE: Building Kubernetes node-images requires everything building upstream Kubernetes requires, we wrap the upstream build. This includes Docker with buildx. See: https://git.k8s.io/community/contributors/devel/development.md#building-kubernetes-with-docker
One shortcut to use a kubernetes release is to specify the version directly to pick up the official tar-gzipped files:
kind build node-image v1.30.0
If you prefer to use existing tar-gzipped files like the ones from the kubernetes release, you can specify those as well from a URL or local directory, for example:
kind build node-image https://dl.k8s.io/v1.30.0/kubernetes-server-linux-arm64.tar.gz
kind build node-image $HOME/Downloads/kubernetes-server-linux-amd64.tar.gz
To clear any confusion, you can specify the type of build explicitly
using --type parameter, please see the following examples:
kind build node-image --type url https://dl.k8s.io/v1.30.0/kubernetes-server-linux-arm64.tar.gz
kind build node-image --type file $HOME/Downloads/kubernetes-server-linux-amd64.tar.gz
kind build node-image --type release v1.30.0
kind build node-image --type source $HOME/go/src/k8s.io/kubernetes/
NOTE: modes other than source directory namely
url,fileandreleaseare only available in kind v0.24 and above.
Settings for Docker Desktop 🔗︎
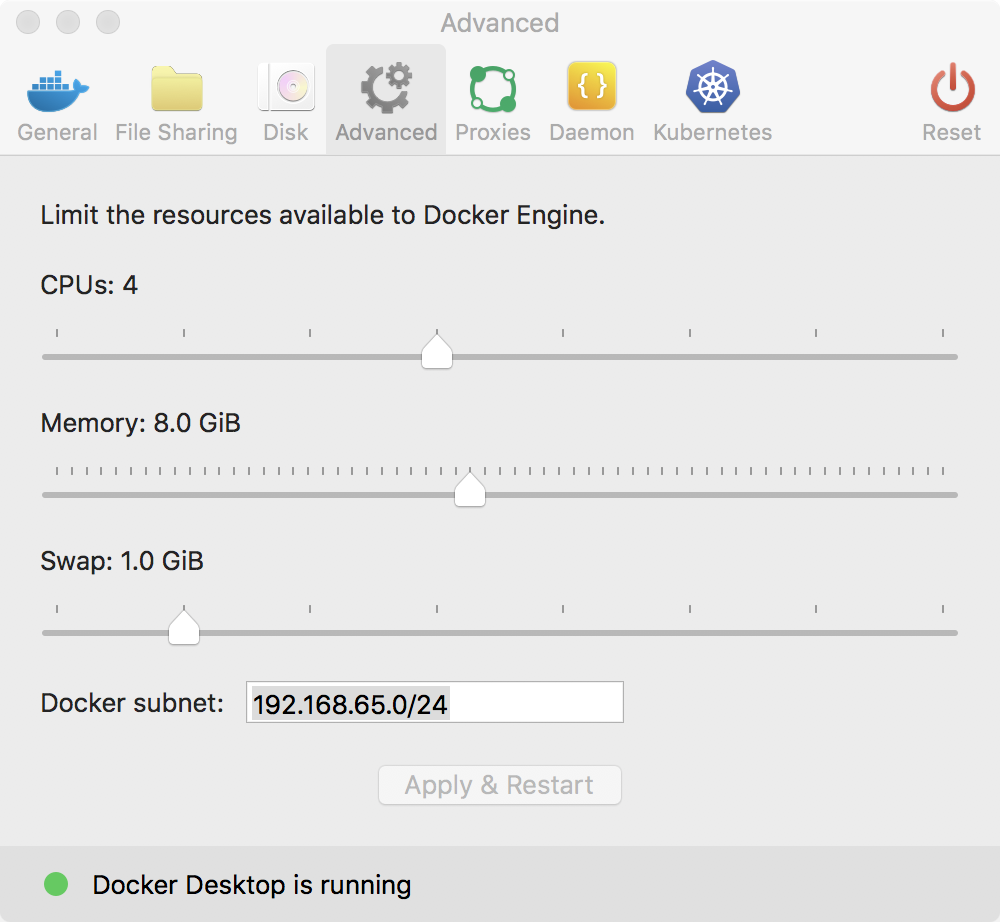
If you are building Kubernetes (for example - kind build node-image) on MacOS or Windows then you need a minimum of 6GB of RAM
dedicated to the virtual machine (VM) running the Docker engine. 8GB is recommended.
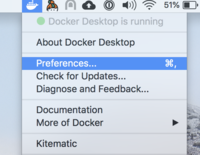
To change the resource limits for the Docker on Mac, you’ll need to open the Preferences menu.
Now, go to the Advanced settings page, and change the settings there, see changing Docker’s resource limits.
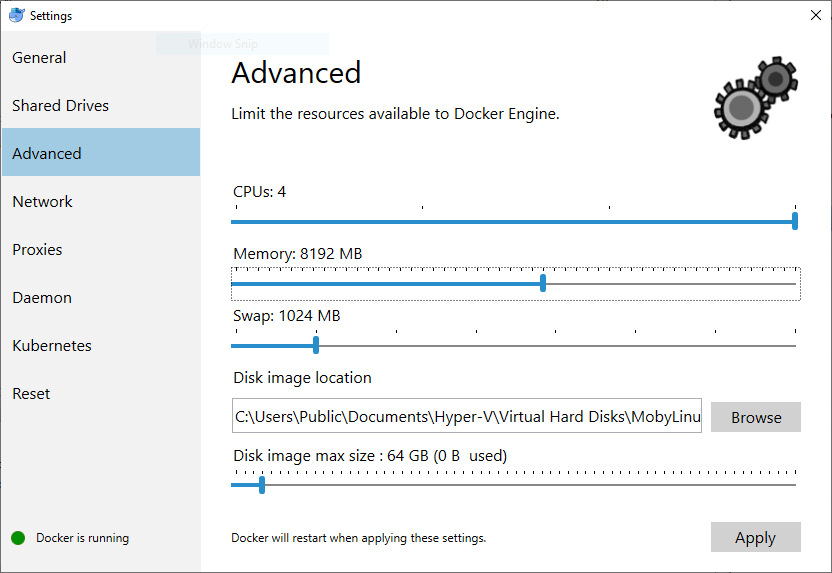
To change the resource limits for the Docker on Windows, you’ll need to right-click the Moby icon on the taskbar, and choose “Settings”. If you see “Switch to Linux Containers”, then you’ll need to do that first before opening “Settings”

Now, go to the Advanced settings page, and change the settings there, see changing Docker’s resource limits.
You may also try removing any unused data left by the Docker engine - e.g.,
docker system prune.
Advanced 🔗︎
Configuring Your kind Cluster 🔗︎
For a sample kind configuration file see kind-example-config.
To specify a configuration file when creating a cluster, use the --config
flag:
kind create cluster --config kind-example-config.yaml
Multi-node clusters 🔗︎
In particular, many users may be interested in multi-node clusters. A simple configuration for this can be achieved with the following config file contents:
# three node (two workers) cluster config
kind: Cluster
apiVersion: kind.x-k8s.io/v1alpha4
nodes:
- role: control-plane
- role: worker
- role: worker
Control-plane HA 🔗︎
You can also have a cluster with multiple control-plane nodes:
# a cluster with 3 control-plane nodes and 3 workers
kind: Cluster
apiVersion: kind.x-k8s.io/v1alpha4
nodes:
- role: control-plane
- role: control-plane
- role: control-plane
- role: worker
- role: worker
- role: worker
Mapping ports to the host machine 🔗︎
You can map extra ports from the nodes to the host machine with extraPortMappings:
kind: Cluster
apiVersion: kind.x-k8s.io/v1alpha4
nodes:
- role: control-plane
  extraPortMappings:
  - containerPort: 80
    hostPort: 80
    listenAddress: "0.0.0.0" # Optional, defaults to "0.0.0.0"
    protocol: udp # Optional, defaults to tcp
This can be useful if using NodePort services or daemonsets exposing host ports.
Note: binding the listenAddress to 127.0.0.1 may affect your ability to access the service.
You may want to see the Ingress Guide and LoadBalancer Guide.
Setting Kubernetes version 🔗︎
You can also set a specific Kubernetes version by setting the node’s container image. You can find available image tags on the releases page. Please use the sha256 shasum for your desired kubernetes version, as seen in this example:
kind: Cluster
apiVersion: kind.x-k8s.io/v1alpha4
nodes:
- role: control-plane
  image: kindest/node:v1.16.4@sha256:b91a2c2317a000f3a783489dfb755064177dbc3a0b2f4147d50f04825d016f55
- role: worker
  image: kindest/node:v1.16.4@sha256:b91a2c2317a000f3a783489dfb755064177dbc3a0b2f4147d50f04825d016f55
Enable Feature Gates in Your Cluster 🔗︎
Feature gates are a set of key=value pairs that describe alpha or experimental features. In order to enable a gate you have to customize your kubeadm configuration, and it will depend on what gate and component you want to enable. An example kind config can be:
|
Configure kind to use a proxy 🔗︎
If you are running kind in an environment that requires a proxy, you may need to configure kind to use it.
You can configure kind to use a proxy using one or more of the following environment variables (uppercase takes precedence):
HTTP_PROXYorhttp_proxyHTTPS_PROXYorhttps_proxyNO_PROXYorno_proxy
NOTE: If you set a proxy it would be passed along to everything in the kind nodes.
kindwill automatically append certain addresses intoNO_PROXYbefore passing it to the nodes so that Kubernetes components connect to each other directly, but you may need to configure additional addresses depending on your usage.
Exporting Cluster Logs 🔗︎
kind has the ability to export all kind related logs for you to explore.
To export all logs from the default cluster (context name kind):
kind export logs
Exported logs to: /tmp/396758314
Like all other commands, if you want to perform the action on a cluster with a
different context name use the --name flag.
As you can see, kind placed all the logs for the cluster kind in a
temporary directory. If you want to specify a location then simply add the path
to the directory after the command:
kind export logs ./somedir
Exported logs to: ./somedir
The structure of the logs will look more or less like this:
.
├── docker-info.txt
└── kind-control-plane/
    ├── containers
    ├── docker.log
    ├── inspect.json
    ├── journal.log
    ├── kubelet.log
    ├── kubernetes-version.txt
    └── pods/
The logs contain information about the Docker host, the containers running kind, the Kubernetes cluster itself, etc.